
Essential Tips for Using Artwork Bleeds in Label Printing
This entry was posted on August 13, 2024 .
To achieve professional-looking custom labels, it’s crucial to set up your artwork correctly. One key element is incorporating artwork bleeds, which ensure that your labels have clean, edge-to-edge color without any unintended borders.
Why Are Bleeds Important for Custom Labels?
Ensuring Clean Edges
Artwork bleeds play a crucial role in providing labels with seamless, edge-to-edge color. This is particularly important for designs with backgrounds or patterns that extend to the edge of the label, giving a smooth and continuous appearance.
Avoiding Unintended White Borders
By including bleeds, you can prevent unwanted white borders around your labels. Bleeds allow the background color or image to extend past the trim line, ensuring that no white space is left visible after cutting.
Enhancing Overall Print Quality
Using bleeds also improves the overall print quality of your labels. The added margin accommodates any minor shifts during trimming, ensuring that your labels look exactly as intended without any design elements missing.
How to Set Up Your Artwork with Bleeds
Standard Bleed Measurements
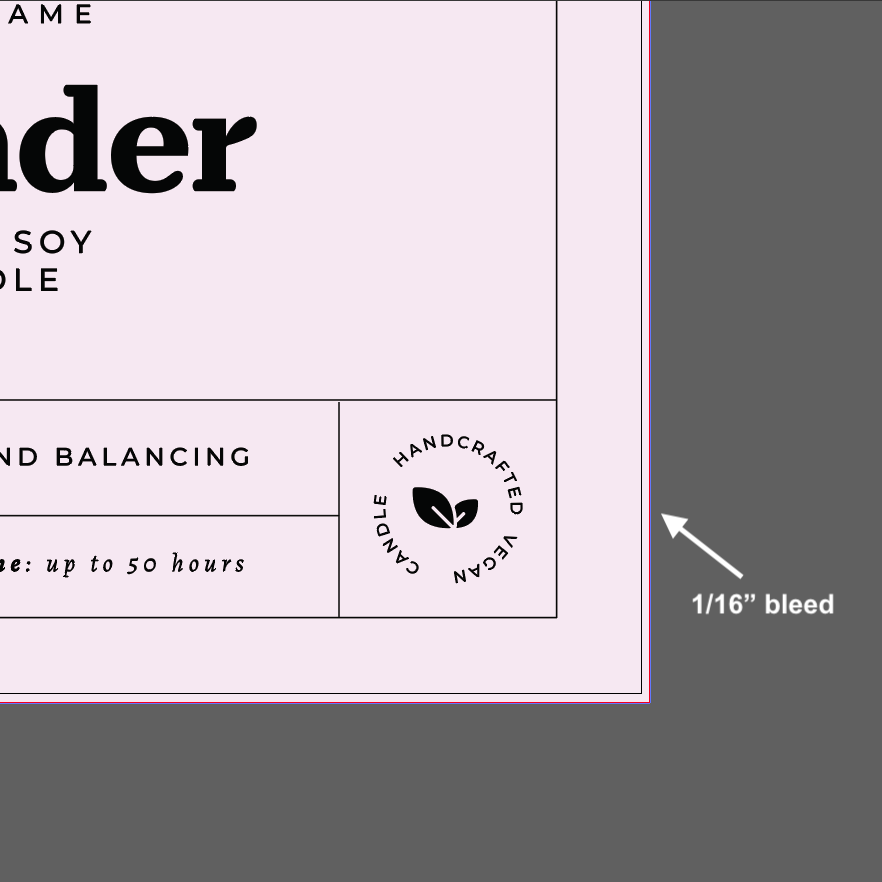
To set up your artwork with bleeds, extend your design by 1/16 inch (0.0625 inches) beyond the trim line. This standard bleed size ensures that your design fully covers the label after trimming.
Calculating the Correct Bleed Size
Calculating the correct bleed size involves adding 0.0625 inches to both the width and height of your label. For instance, if your original label size is 3 x 4 inches, the artwork with bleed should be 3.0625 x 4.0625 inches.
Using Visual Aids to Perfect Your Design
Visual aids can be extremely helpful in understanding how bleeds work. Use mock-ups or digital templates to visualize your design with a 0.0625-inch bleed on each side, ensuring all necessary elements stay within the safe zone. This approach helps in preventing any unwanted surprises after the labels are printed and cut.
Adding Bleeds in Design Software
Most design software, such as Adobe Illustrator and Photoshop, allows you to add bleeds during document setup. Look for bleed settings in the new document setup window and input the standard bleed size. This feature automatically extends your artwork beyond the trim lines, simplifying the process of setting up bleeds.
Keeping Important Elements Within Safe Zones
While bleeds ensure your background extends to the edge, keep essential elements like text and logos within the safe zone, typically 1/8 inch inside the trim line. This precaution prevents important parts from being trimmed off and maintains the integrity of your design. Make sure to use guides or rulers within your design software to easily position these elements accurately.
Verifying Your Work Before Submission
Before submitting your artwork, double-check that bleeds are properly set and all critical elements are within the safe zones. Use the print preview tools in your design software to verify your setup and make any necessary adjustments. Taking the time to review your design can help catch potential issues before they become costly errors.
Finalizing Your Artwork for Printing
Choosing the Right File Format
Submit your artwork in high-resolution formats such as PDF, AI, or EPS. These formats maintain the quality and precision needed for professional printing. Ensure that your file includes bleeds and crop marks for accurate trimming, which helps the print shop handle your order efficiently and accurately.
Communicating with Your Printing Provider
Effective communication with your printer is key to a successful print job. Clearly convey your bleed settings and any specific requirements. A print-ready file with correct bleeds helps minimize errors and ensures a smooth printing process. Don’t hesitate to reach out to your printer if you have questions about file specifications or printing requirements.
Utilizing Templates and Guides
Use templates and guides provided by your printer to ensure your artwork meets their specifications. These resources streamline the setup process and improve accuracy, reducing the risk of errors. Templates are especially useful for standard label sizes and can be easily customized to fit your design needs.
Avoiding Common Mistakes
Forgetting to Add Bleeds
Always remember to add bleeds when setting up your artwork. Without bleeds, your design may not cover the entire label, resulting in unwanted white borders. Including bleeds in your initial setup helps ensure a professional and polished final product.
Using the Incorrect Bleed Size
Ensure you use the correct bleed size of 0.0625 inches. Incorrect bleed sizes can lead to improper trimming and a less polished finish. Double-check your settings in the design software to confirm that the bleed size is accurate.
Misplacing Text and Important Design Elements
Keep critical elements within the safe zone, away from the trim line. Placing text and graphics too close to the edge increases the risk of them being cut off during trimming. Utilize guides in your design software to maintain consistent margins and avoid these common pitfalls.
FAQ: Artwork Bleeds in Label Printing
What is the purpose of bleed in label printing?
Bleeds are used in label printing to ensure that the color and design extend to the edge of the label, preventing white borders after trimming. They provide a margin of error for slight misalignments during cutting.
Can I add bleeds manually in my design?
Yes, you can manually add bleeds by extending your background color or image beyond the trim line by the standard bleed size. Design software often includes tools to help automate this process, making it easier to apply bleeds consistently.
How do bleeds affect the final appearance of my labels?
Bleeds enhance the final appearance by ensuring a seamless transition from the design to the edge of the label. This helps create a professional and cohesive look that enhances the overall quality of your printed labels.
What should I do if my design software doesn't support bleeds?
If your design software doesn’t support bleeds, you can manually adjust the canvas size to include the extra bleed margin. Alternatively, consider using software that does offer bleed support to simplify the process and improve accuracy.
Are there specific templates I can use for setting up bleeds?
Yes, many printing providers offer templates that include bleed settings for various label sizes. These templates ensure that your design meets the necessary specifications and reduces the likelihood of errors during printing.
Related Products
-
 Custom Labels
-
Bath & Body Product Labels
-
Custom Candle Labels
-
E-Juice Vape Labels
-
Variable Label Printing
-
Health & Nutraceutical Product Labels
-
Custom Beverage Labels
-
Custom Bottle Labels
-
Custom Lip Balm Labels
-
Home & Garden Product Labels
-
Custom Warning & Safety Labels
-
Perfume Bottle Labels
-
Bumper Stickers
-
Custom Prop 65 Warning Labels
-
Extended Content Labels
-
Custom CBD Labels
-
Barcode Labels
-
QR Code Labels
-
Honey Jar Labels
-
Tea Labels
-
Custom Pet Product Labels
-
Custom Hemp Labels
-
Canning Labels
-
Custom Hand Sanitizer Labels
-
Custom Beer Labels
-
Sustainable Hemp Label Material
-
Blank Labels
-
Embossed Labels
-
Custom Hot Stamp Labels
-
Custom Stickers
 Custom Labels
  Custom Beverage Labels
  Custom Lip Balm Labels
  Custom Warning & Safety Labels
  Perfume Bottle Labels
  Bumper Stickers
  Custom Prop 65 Warning Labels
  Custom Stickers